The evaporator section type is very important
since it generally defines the overall configuration of the HRSG unit. For this
discussion, we will use the word "type" to refer to the general configuration of
the evaporator. Even though there are many types, or configurations of HRSGs, we
will define five general types for our discussion.
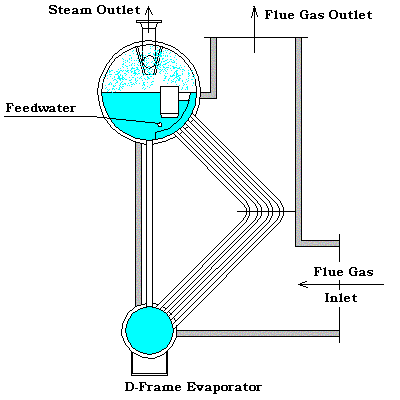
D-Frame evaporator layout. This configuration is very popular for HRSG
units recovering heat from small gas turbines and diesel engines. It is a very
compact design and can be shipped totally assembled. It is limited, however,
since the bent tube arrangement quickly causes the module to exceed shipping
limitations for units having a large gas flow.
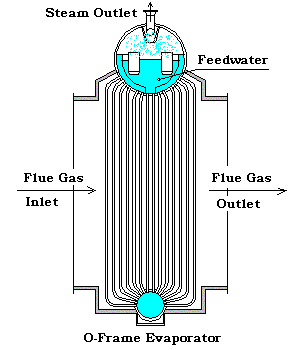
O-Frame evaporator layout. This configuration has probably been used for
more years than any of the others. It has the advantage of the upper header
being configured as the steam separation drum. Or, the upper header can be
connected to the steam drum by risers, allowing more than one O-Frame evaporator
to be connected to the same steam drum, resulting in shipable modules being able
to handle very large gas flows.
A-Frame evaporator layout. This configuration is simply a variation of
the O-Frame Evaporator. It was popular for services with a large amount of ash,
since the center area between the lower drums could be configured as a hopper to
collect and remove solid particles.
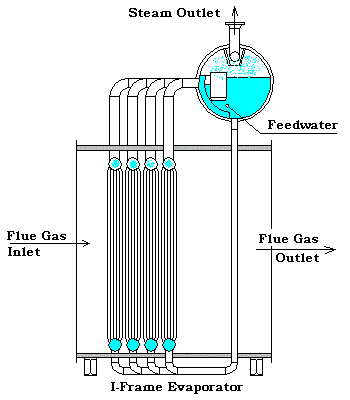
I-Frame evaporator layout. In the past twenty years, this configuration
has become the most popular of all the Evaporator designs. This type module can
be built in multiple axial modules or in multiple lateral modules, allowing it
to be designed to accept any gas flow. There are numerous variations of this
design where tube bundles may contain one, two, or three rows of tubes per
header. It is also, normally, more economical to manufacture, ship and field
construct. The tube bundles may be shipped to field installed in the modules, or
as loose bundles which are installed into a field erected
shell.
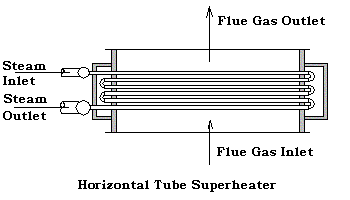
Horizontal tube evaporator layout. The horizontal tube evaporator is
used, not only for heat recovery from Gas Turbine exhaust, but for recovery from
flue gases in Refinery and Petrochemical furnaces also. It has similar size
limitations due to shipping restrictions similar to the O-frame modules. It is
generally a less expensive unit to manufacture than the other configurations,
but if it is a natural circulation design with large tubes, such as in some CO
Boilers, or very long tubes, special consideration needs to be given to assure
all tubes are provided with sufficient effluent. These considerations will be
discussed later on in this document.
After deciding on the evaporator type to be used for the unit, the next
important step in the design of an HRSG unit is to decide the arrangement of the
various coils in the unit. Of course, if only an evaporator is present, this may
consist of a very simple schematic, but if, as in most cases, there are more
than one coil, then consideration needs to be given as to their position in the
gas stream.
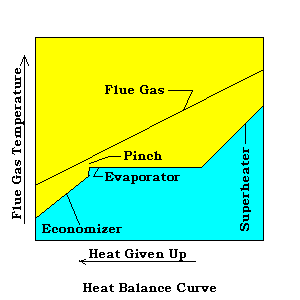
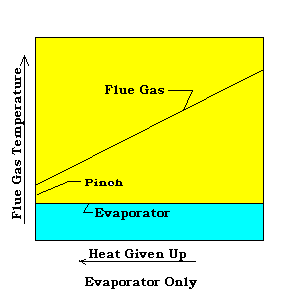
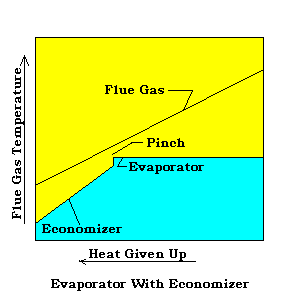
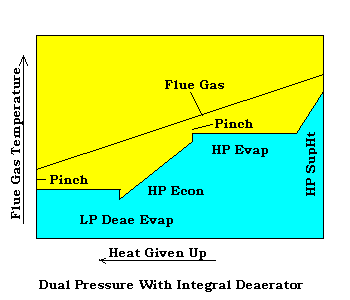
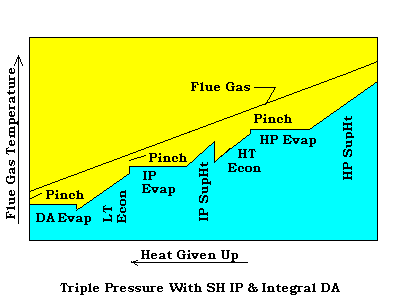
In viewing this generalized sketch showing the relationship between the heat
absorbed and the heat given up, it is easy to see the area referred to as the
"pinch" at the evaporator outlet. By laying a straight edge on the heat given
up line and rotating it while holding it at the pinch, it is also, easy to see
that, at a very high inlet temperature, there may be a critical approach
temperature occur at the economizer inlet, and going the other way, at a lower
inlet temperature, this may occur at the superheater
outlet.
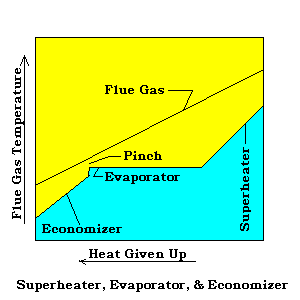
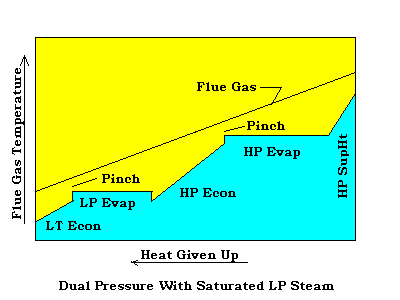
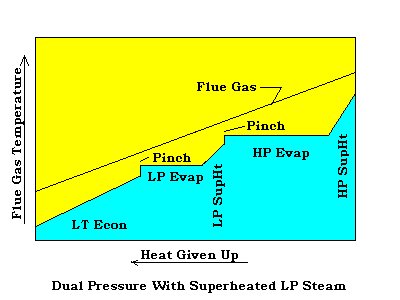
Of course, modern HRSG units are not always this simple. The components can
and are placed in many configurations to achieve desired results. The range of
arrangements that the coils may be placed, is only limited by the users
imagination and the constraints of the temperature approaches. Shown below are
just a few examples of various arrangements.
It is not important that you necessarily use this style schematic, but it is
important to be consistent in the style you use. If you always present an
evaporator in the same way, and a superheater always looks like "your"
superheater, the flow schematics become very recognizable to anyone needing to
refer to them. Remember, the flow schematic does not need to represent the
actual mechanical design of the HRSG, neither in looks, or direction of flow,
hot to cold, etc.
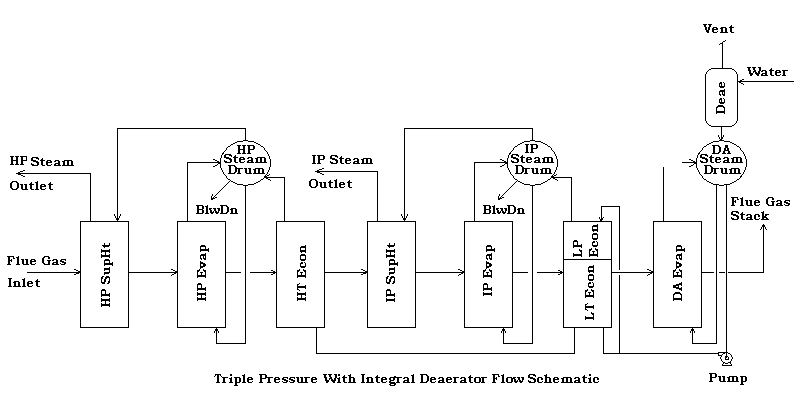
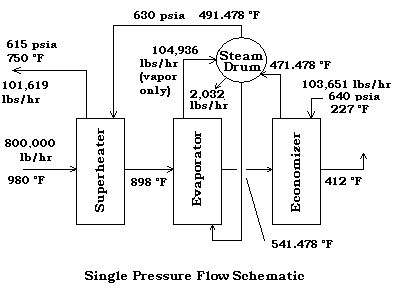
Now, using a similar approach to above, let's construct a flow schematic to
represent a triple pressure unit with an integral deaerator.
We begin with the first sample schematic that we prepared in Section 3, a
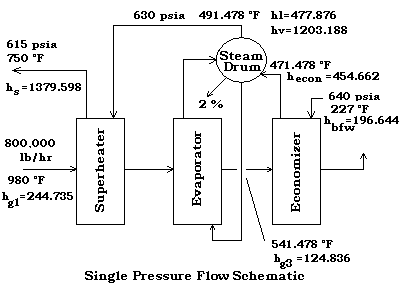
single pressure HRSG with a superheater, evaporator, and economizer.
For our process conditions, we will assume the following: Gas Side :
800,000 lbs/hr of Gas Turbine Exhaust at 980 °F Setting Loss To Atmosphere,
2% of Heat Absorbed Maximum Back Pressure at Gas Turbine Exhaust Flange, 8"
H2O
Gas Properties : Volume %
Nitrogen, N2
72.55
Oxygen, O2
12.34
Carbon Dioxide, CO2
3.72
Water, H2O
10.52
Argon, Ar
0.87
Sulphur Dioxide, SO2
0.0
Carbon Monoxide, CO
0.0
Tube Side : Steam at outlet, Maximum Flow at 600 psig and 750 °F Feedwater
at 227 °F and pressure required at inlet.
For our example, we will make the
following assumtions :
Pinch At Evaporator, °F
50.0
Economizer Water Approach, °F
20.0
Blowdown, % of Steam Out
2.0
Pressure Drop In Superheater, psi
15.0
Pressure Drop In Economizer, psi
10.0
Now, we have set all of our conditions, so we can proceed with a heat
balance. For these calculations, we will need a calculator to provide us with
the properties of the flue gas, water, and steam. We can start these in separate
windows so we can keep them available as we work out our solution.
We can now populate our schematic with all known values.
Now we can calculate the missing data. Heat Available To Evaporator And
Superheater:
Selecting the tube material and size to use in a HRSG design is really a
matter of experience. As you work with different HRSG's for different services,
you develop a knowledge of what fit before in a similar design, so you know
where to start with a new design. But a few general rules can be used to start
the selection.
For the typical, general purpose HRSG, using standard tubing sizes, the 2"
tube size will normally work out to be the most economical tube size. The cost
will generally go up with a smaller or larger tube size. Most HRSG units recover
heat from a relatively low temperature gas, i.e., less than 1,000 °F. Of course,
many of the modern HRSG's are supplementary fired to achieve even greater
efficiencies. But, with the exception of the superheater, you can normally
assume that carbon steel tubes will work for the evaporator and the economizer.
If the superheater outlet temperatures are low, such as 600 °F and below, you
should be able to assume carbon steel tubes to start. If higher than 600 °F, you
may want to start with T11 tubes.
In a similar manner, you can make some preliminary estimates to determine
what the design metal temperature for the HRSG tubes need to be. With this
temperature, you would select the least material that is good for the
temperature. Eventual analysis may show that a higher alloy and a thinner wall
may be more economical, so running calculations with several materials is always
wise.
Typical generic, pipe and tube specifications used for HRSG
tubes:
Generic Specification
Pipe Specification
Tube Specification
Carbon Steel
SA 106 Gr B
SA 178 A
1Ľ Cr ˝ Mo
SA 335 Gr P11
SA 213 T11
2Ľ Cr 1 Mo
SA 335 Gr P22
SA 213 T22
5 Cr ˝ Mo
SA 335 Gr P5
SA 213 T5
9 Cr 1 Mo
SA 335 Gr P9
SA 213 T9
18 Cr 8 Ni
SA 312 TP 304
SA 213 TP 304
16 Cr 12 Ni 2 Mo
SA 312 TP 316
SA 213 TP 316
18 Cr 10 Ni Ti
SA 312 TP 321
SA 213 TP 321
18 Cr 10 Ni Ti
SA 312 TP 321H
SA 213 TP 321H
And other, more exotic materials for special services are used as may be
needed. The wall thickness required, for the heat absorbing tubes, is calculated
by using the ASME Section 1. For heat absorbing tubes, there are two formulas
that may apply, so it is normal practice to check the required thickness and
maximum allowed working pressure, MAWP, using both formulas, then using the more
appropriate.
Tube Wall Thickness: Using ASME, Section 1, PG
27.2.1
t = (P * D) / (2 * S1 + P) + 0.005 * D +
e
And using ASME, Section 1, PG 27.2.1
t = (P * D) / (2 * S2 *E + 2*y*P) +
C
Where,
t = Minimum required thickness, in
P = Maximum allowable working pressure, psia
D = Outside diameter of cylinder, in
S1 = Maximum allowable stress value (PG-23), psi
S2 = Maximum allowable stress value (PG-23), psi
e = Thickness factor for expanded tube ends
y = Temperature coefficient
E = efficiency
C = Minumum allowance for threading and structural stability,
in
Using the above stress values and formulas, we can now calculate the minimum
wall thickness for a tube.
In the above tube wall thickness calculator, only the "Tube Specifications",
such as SA-178 Gr. A, are being used for stress values, so this calculator is
not valid if using a "Pipe Specification", such as SA-106 Gr. B, since the
stress values are different. A little bit of confusion over why a pipe is called
a tube, when it is in a HRSG, might be expected. But usage dictates that the
heat transfer tubes be referred to as tubes regardless of whether they are
manufactured from materials specified as tubes or as pipes. If the use is as a
downcomer or riser, etc., it is called a "pipe".
When using tubes with the OD of a standard pipe size or using piping
specifications and the HRSG uses returns, you would normally select a standard
return bend to return the flow to the next tube. These returns bends are
normally manufactured in two turning radii, called "short radius" and "long
radius". The short radius return refers to a 180° return bend using a radius of
one nominal diameter, ie, a 4" pipe size return has a radius of 4", and a 6" has
a radius of 6", etc. The "long" radius bend has a radius equal to 1.5 nominal
diameters so a 4" return has a radius of 6" and a 6" has a radius of 9". These
standard returns are manufactured in most of the pipe schedules and are also
available in "minimum wall" specifications.
Typical generic and pipe
specifications used for return bends:
Generic Specification
Pipe Specification
Carbon Steel
SA 234 WPB
1Ľ Cr ˝ Mo
SA 234 WP11
2Ľ Cr 1 Mo
SA 234 WP22
5 Cr ˝ Mo
SA 234 WP5
9 Cr 1 Mo
SA 234 WP9
18 Cr 8 Ni
SA 403 WP304
16 Cr 12 Ni 2 Mo
SA 403 WP316
18 Cr 10 Ni Ti
SA 403 WP321
18 Cr 10 Ni Ti
SA 403 WP321H
If using standard pipe fittings manufactured to standard pipe schedules, you
would assume 80% of the standard wall thickness. If you are bending tubes or
pipe for the application, you would need to calculate the thinning in the bend.
The following calculator estimates the ratio of that thinning.
Pipe-Wall
Thinning In Bends: Tube Length Selection
Now that we have selected a tube diameter, material, wall thickness, and tube
spacing, we need to decide what length the tubes should be. Pipe and tubes are
manufactured in random lengths, ie, since the billet size varies, the actual
length of the tube that is extruded, from a billet, varies from one tube to the
next. For lower cost materials, it is usually cheaper to scrap pieces of tube,
then it is to make center welds to try and use all the material. But another
high cost factor involved with the length is the supports and guides for the
tube in the HRSG.
For vertical tubes, usually the overall HRSG shape and size dictate the best
tube length. It is necessary to consider the maximaum shipping width and length
in setting the tube length. The support and guide requirement varies depending
on whether the tubes are supported from the top(hung) or bottom of the
tubes.
In the horizontal tube HRSG's, the overall shape and size also figure into
the equation. But, within these constraints, the span between supports must be
considered. If the user has not specified a maximum span, then generally you
would not want to exceed 35 tube OD's. This has been a general industry "not to
exceed" rule of thumb used for many HRSG designs. But care should be taken to
consider the service and wall temperature of the tubes. Once you have determined
the span between supports, the tube length would be selected to use the minimum
number of supports, while avoiding unnecessary centerwelds, if centerwelds are
allowed by user. All of this must be balanced with the fact that the pressure
loss in the tubes is increased dramatically in the returns, so generally you
want the longest straight tube possible. The pressure loss in the returns is
reviewed in the "Process" section , under "Intube Pressure Drop".
Now, using the single pressure HRSG that we demonstrated in developing the
heat balance in Section 4, we can select the heat transfer tubes necessary to
proceed with the thermal design. We are going to select an HRSG unit using
2.000" od tubes, so the following selections will be based on this tube od.
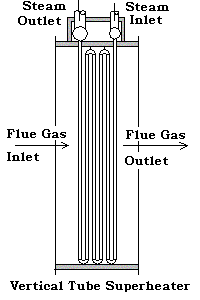
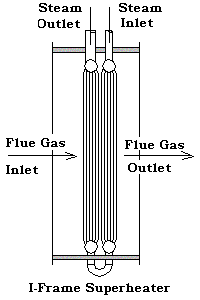
For the superheater, we can assume that the tube wall temperature will be
above 750 °F and less than 850 °F, so we will use the 850°F for the design
temperature. We will select for our HRSG design, the O-Frame evaporator. So for
the superheater we could use a Vertical Tube or an I-Frame type. We will choose
the I-Frame.
This design can use either bent tubes, i.e., three rows per bundle, or two
straight tubes in a bundle. For this sample, we decide we want three rows per
bundle using an 8" pipe header, then we we will decide that the bend radius of
the bend in the first and third rows is 6". Using a design pressure of 700 psia,
we can check to see if a standard 0.120" minimum wall thickness will be
sufficient for this design. Using our bend thinning calculator, we see that the
wall thickness after bending will be 0.1013". Then using the tube wall thickness
calculator, we see that using the PG 27.2.1 method, that with our 1/32"
corrosion allowance, the tube thickness is okay.
Now, we look at our evaporator, the O-Frame design that we selected
above.
Okay, here again we have bent tubes. We will assume that the bend radius of
these tubes is 12", so the wall thickness using 0.120" to start with, will be
0.1091" after bending. Using SA 178 Gr A tubes, we check the required wall
thickness and find that this tube will be fine. Note that setting the design
temperature below 700° F really doesn't have any affect on the PG 27.3.1
calculation, since this formula requires a minimum of 700 °F for the stress
value selection. When we check the required wall, we get 0.1102 if we use a
1/32" corrosion allowance. but since no corrosion allowance was indicated, we
will use this tube.
For our economizer, we will use the I-Frame design, but use two tubes per
bundle with 6" pipe headers, so we will once again need bent tubes, using a 6"
bend radius. This results in a 0.1013" wall thickness at the bends. For this
economizer, the 0.120' wall thickness will be okay without corrosion
allowance.
as been a general industry "not to
exceed" rule of thumb used for many HRSG designs. But care should be taken to
consider the service and wall temperature of the tubes. Once you have determined
the span between supports, the tube length would be selected to use the minimum
number of supports, while avoiding unnecessary centerwelds, if centerwelds are
allowed by user. All of this must be balanced with the fact that the pressure
loss in the tubes is increased dramatically in the returns, so generally you
want the longest straight tube possible. The pressure loss in the returns is
reviewed in the "Process" section , under "Intube Pressure Drop".
Now, using the single pressure HRSG that we demonstrated in developing the
heat balance in Section 4, we can select the heat transfer tubes necessary to
proceed with the thermal design. We are going to select an HRSG unit using
2.000" od tubes, so the following selections will be based on this tube od.
For the superheater, we can assume that the tube wall temperature will be
above 750 °F and less than 850 °F, so we will use the 850°F for the design
temperature. We will select for our HRSG design, the O-Frame evaporator. So for
the superheater we could use a Vertical Tube or an I-Frame type. We will choose
the I-Frame.
This design can use either bent tubes, i.e., three rows per bundle, or two
straight tubes in a bundle. For this sample, we decide we want three rows per
bundle using an 8" pipe header, then we we will decide that the bend radius of
the bend in the first and third rows is 6". Using a design pressure of 700 psia,
we can check to see if a standard 0.120" minimum wall thickness will be
sufficient for this design. Using our bend thinning calculator, we see that the
wall thickness after bending will be 0.1013". Then using the tube wall thickness
calculator, we see that using the PG 27.2.1 method, that with our 1/32"
corrosion allowance, the tube thickness is okay.
Now, we look at our evaporator, the O-Frame design that we selected
above.
Okay, here again we have bent tubes. We will assume that the bend radius of
these tubes is 12", so the wall thickness using 0.120" to start with, will be
0.1091" after bending. Using SA 178 Gr A tubes, we check the required wall
thickness and find that this tube will be fine. Note that setting the design
temperature below 700° F really doesn't have any affect on the PG 27.3.1
calculation, since this formula requires a minimum of 700 °F for the stress
value selection. When we check the required wall, we get 0.1102 if we use a
1/32" corrosion allowance. but since no corrosion allowance was indicated, we
will use this tube.
For our economizer, we will use the I-Frame design, but use two tubes per
bundle with 6" pipe headers, so we will once again need bent tubes, using a 6"
bend radius. This results in a 0.1013" wall thickness at the bends. For this
economizer, the 0.120' wall thickness will be okay without corrosion
allowance.
Extended surface material and
selection
The heat transfer sections of the HRSG frequently use extended surface to
improve the overall heat exchange between the hot gases and the steam or water
in the tubes. These extended surfaces are usually either a thin plate fin wraped
helically around the tube or round or eliptical shaped studs. Following is a
description of the more popular extended surfaces.
Segmented
Fins: These are usually one of the two types shown below.
High Frequency Continuously Welded
Standard Frequency Spot Welded
The standard frequency, spot welded, design is not used as often since this
design is normally selected when using very thin, high density finning such as
in a large heat recovery boiler. Most HRSG designs use fins less than 0.049 inch
thick. The standard frequency, spot welded fin also has a foot which presents a
place where corrosion can occur if flue gases are corrosive or moisture is
present.
Solid Fins: These are the most popular fins for modern
HRSG's.
High Frequency Continuously Welded
Stud Fins: These are used generally
when the fuel is No. 6 or higher.
Resistance Welded
Thermal rating procedures for all these extended surface types are presented
in the following pages. Both segmented fin types are rated using the same
formulas.
For our sample boiler, that we have been developing throughout this material,
we will choose to use 0.049" thick fins with a density of 6 fins per inch. We
will use an 11% chrome alloy material for the superheater, A-176 TP409. For the
evaporator and the economizer, we will use carbon steel, A 366, which should be
good for all the temperatures in these sections. We will recheck our selections
after doing the thermal calculations to confirm they are okay. It is important
to note, that since the source of our gas is a gas turbine, it is a very clean
service and we could have used a thinner fin at a higher density.